Introduction
Material UI is a dynamic React framework that offers abundant customisable components and utilities that help developers create better web apps with improved UI/UX. One such component is the Material UI Tooltip, which is a custom-made Material UI component that displays informative text on an element’s hover, click, focus, or tap.
This article will deeply dive into the Material UI Tooltip component and highlight its functionalities, variations, and event placements. We will also explore a potential use case in a typical React application.
Steps we'll cover:
- What is Material UI?
- Getting started with Material UI Tooltip
- Positioning Material UI Tooltips
- How to customise your Material UI Tooltip component
- Material UI Tooltip Event Triggers
- Material UI Tooltip custom child(ren) elements
- Building a Login form UI with React and Material UI Tooltip
What is Material UI?
Material UI is a user interface framework that provides pre-defined and customisable React components to help with web development. The Material UI components are based on Google's top Material Design. Many developers now structure their projects with Material UI because it simplifies and improves web design.
Material UI comes with several component categories, including
- Data Display components
- Input components
- Navigation components
- Layout components, e.t.c.
The Material UI Tooltip is a vivid example of the Data display components.
Getting started with Material UI Tooltip
Tooltips reveal explanatory text when an element is hovered, focused, or tapped. Material UI includes custom Tooltip components that help highlight the context of an element on the DOM.
Here’s a demo of how to use the Material UI <Tooltip/> component:
import * as React from 'react';
import  ZoomInIcon from '@mui/icons-material/ZoomIn';
import IconButton from '@mui/material/IconButton';
import Tooltip from '@mui/material/Tooltip';

export default function BasicTooltip() {
  return (
    <div style={{margin: '100px'}}>
    <Tooltip title="Zoom In">
      <IconButton>
        <ZoomInIcon />
      </IconButton>
    </Tooltip>
    </div>
  );
}
Here’s the result:

Positioning Material UI Tooltips
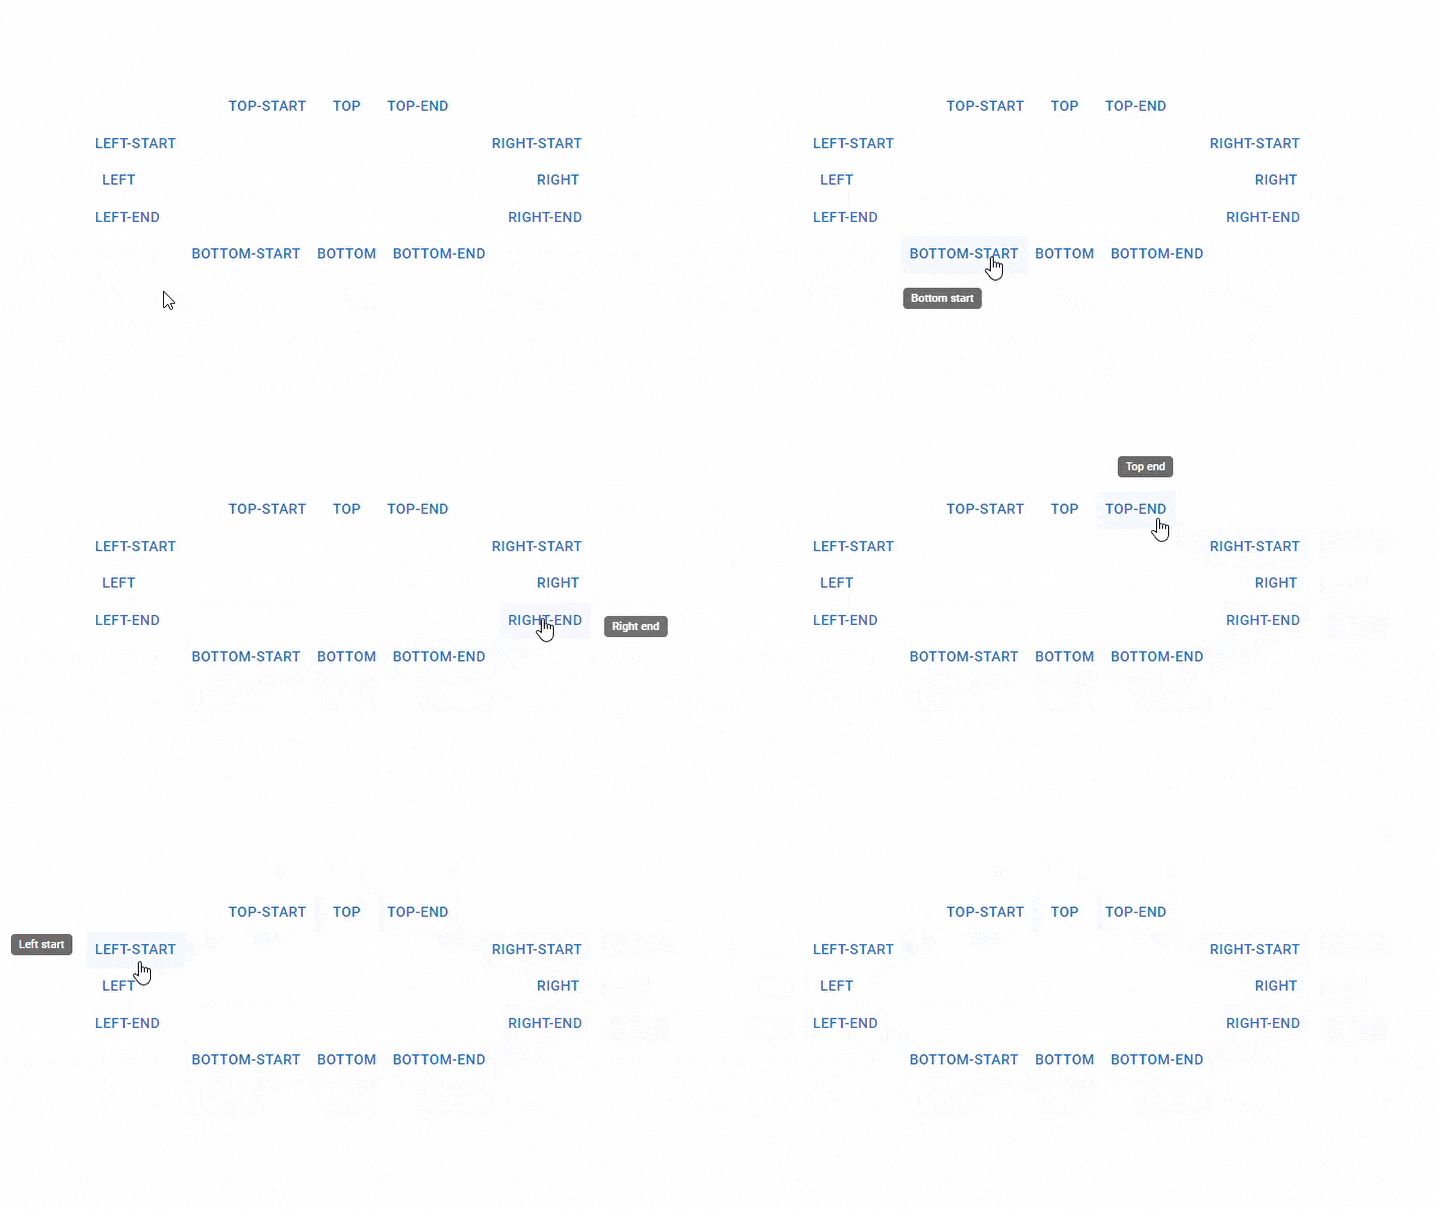
The Tooltip has 12 different placement options. They lack directional arrows and instead rely on the motion from the source to convey direction.
Show Code
import * as React from 'react';
import Box from '@mui/material/Box';
import Grid from '@mui/material/Grid';
import Button from '@mui/material/Button';
import Tooltip from '@mui/material/Tooltip';

export default function PositionedTooltips() {
  return (
    <Box sx={{ width: 500 }}>
      <Grid container justifyContent="center">
        <Grid item>
          <Tooltip title="Top start" placement="top-start">
            <Button>top-start</Button>
          </Tooltip>
          <Tooltip title="Top" placement="top">
            <Button>top</Button>
          </Tooltip>
          <Tooltip title="Top end" placement="top-end">
            <Button>top-end</Button>
          </Tooltip>
        </Grid>
      </Grid>
      <Grid container justifyContent="center">
        <Grid item xs={6}>
          <Tooltip title="Left start" placement="left-start">
            <Button>left-start</Button>
          </Tooltip>
          <br />
          <Tooltip title="Left" placement="left">
            <Button>left</Button>
          </Tooltip>
          <br />
          <Tooltip title="Left end" placement="left-end">
            <Button>left-end</Button>
          </Tooltip>
        </Grid>
        <Grid item container xs={6} alignItems="flex-end" direction="column">
          <Grid item>
            <Tooltip title="Right start" placement="right-start">
              <Button>right-start</Button>
            </Tooltip>
          </Grid>
          <Grid item>
            <Tooltip title="Right" placement="right">
              <Button>right</Button>
            </Tooltip>
          </Grid>
          <Grid item>
            <Tooltip title="Right end" placement="right-end">
              <Button>right-end</Button>
            </Tooltip>
          </Grid>
        </Grid>
      </Grid>
      <Grid container justifyContent="center">
        <Grid item>
          <Tooltip title="Bottom start" placement="bottom-start">
            <Button>bottom-start</Button>
          </Tooltip>
          <Tooltip title="Bottom" placement="bottom">
            <Button>bottom</Button>
          </Tooltip>
          <Tooltip title="Bottom end" placement="bottom-end">
            <Button>bottom-end</Button>
          </Tooltip>
        </Grid>
      </Grid>
    </Box>
  );
}

Note: Tooltip positioning is critical when using them in a web application. A poorly placed Tooltip may detract from the overall UX of the app.
How to customise your Material UI Tooltip component
Material UI Tooltip is a very dynamic component, so it has several variations. Here are a few ways you can customise Material UI Tooltip in your next project:
Arrow Tooltips
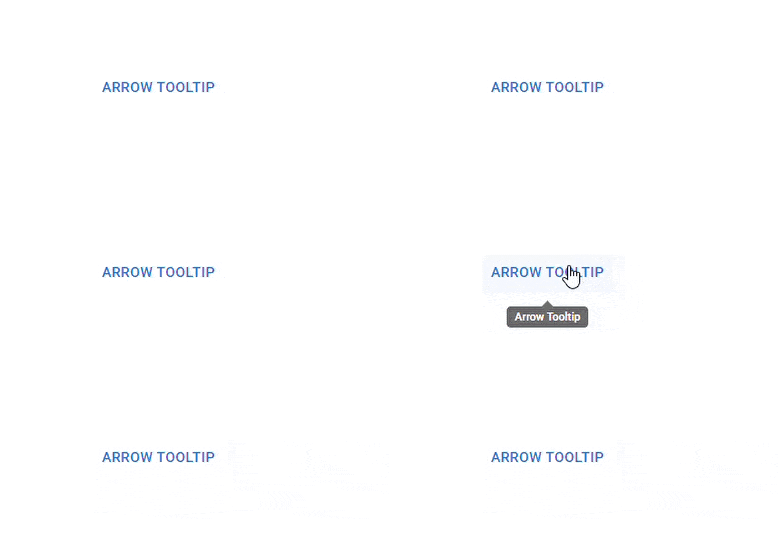
You can use the arrow prop to add an arrow to your tooltip, indicating which element it refers to. This gives the Tooltip element more definition as it points at the element it describes.
Here’s what I mean:
import * as React from 'react';
import Button from '@mui/material/Button';
import Tooltip from '@mui/material/Tooltip';

export default function ArrowTooltips() {
  return (
    <div style={{margin: '25%'}}>
      {/* adding the arrow prop to ensure our tooltip has a pointer */}
    <Tooltip title="Arrow Tooltip" arrow>
      <Button>Arrow Tooltip</Button>
    </Tooltip>
    </div>
  );
}
Here’s what it looks like:


Width variations
The Material UI Tooltip component wraps long text by default, but you can adjust its width to suit your preferences and how well it fits that aspect of your application.
Here’s a sample:
import * as React from 'react';
import { styled } from '@mui/material/styles';
import Button from '@mui/material/Button';
import Tooltip, { TooltipProps, tooltipClasses } from '@mui/material/Tooltip';

const CustomWidthTooltip = styled(({ className, ...props }: TooltipProps) => (
  <Tooltip {...props} classes={{ popper: className }} />
))({
  [`& .${tooltipClasses.tooltip}`]: {
    maxWidth: 500,
  },
});

const NoMaxWidthTooltip = styled(({ className, ...props }: TooltipProps) => (
  <Tooltip {...props} classes={{ popper: className }} />
))({
  [`& .${tooltipClasses.tooltip}`]: {
    maxWidth: 'none',
  },
});

const longText = `
Aliquam eget finibus ante, non facilisis lectus. Sed vitae dignissim est, vel aliquam tellus.
Praesent non nunc mollis, fermentum neque at, semper arcu.
Nullam eget est sed sem iaculis gravida eget vitae justo.
`;

export default function VariableWidth() {
  return (
    <div style={{margin: '25%'}}>
      <Tooltip title={longText}>
        <Button sx={{ m: 1 }}>Default Width [300px]</Button>
      </Tooltip>
      <CustomWidthTooltip title={longText}>
        <Button sx={{ m: 1 }}>Custom Width [500px]</Button>
      </CustomWidthTooltip>
      <NoMaxWidthTooltip title={longText}>
        <Button sx={{ m: 1 }}>No width set</Button>
      </NoMaxWidthTooltip>
    </div>
  );
}

Material UI Tooltip Transitions
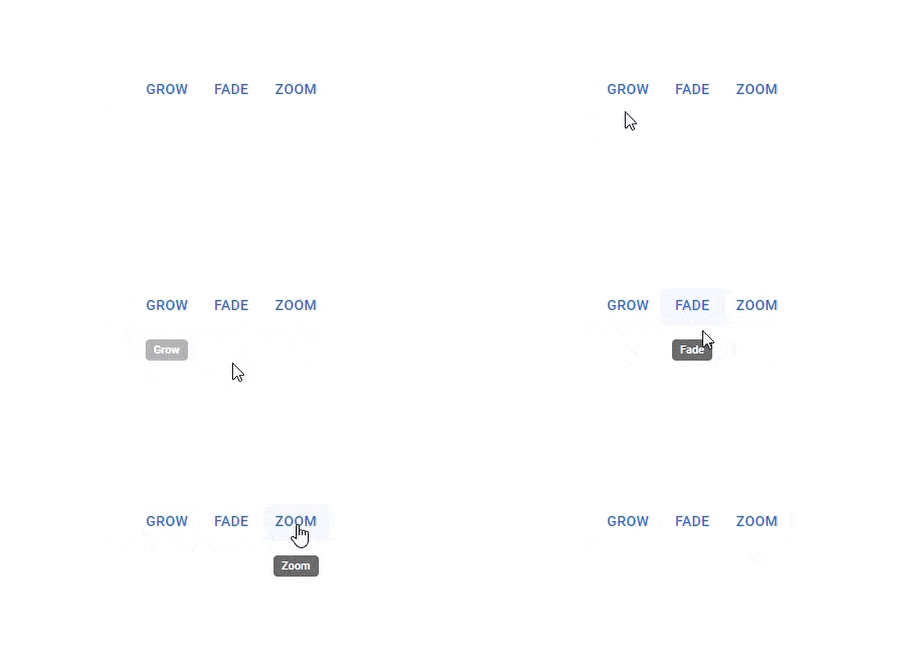
The Material UI Tooltip can be animated with different transitions and display delay variations. It could be set to grow, fade and zoom like this:
import * as React from 'react';
import Button from '@mui/material/Button';
import Tooltip from '@mui/material/Tooltip';
import Fade from '@mui/material/Fade';
import Zoom from '@mui/material/Zoom';

export default function TransitionsTooltips() {
  return (
    <div style={{margin: '25%'}}>
      <Tooltip title="Grow" TransitionProps={{ timeout: 1000 }}>
        <Button>Grow</Button>
      </Tooltip>
      <Tooltip
        TransitionComponent={Fade}
        TransitionProps={{ timeout: 1000 }}
        title="Fade"
      >
        <Button>Fade</Button>
      </Tooltip>
      <Tooltip TransitionComponent={Zoom} title="Zoom" TransitionProps={{ timeout: 1000 }}>
        <Button>Zoom</Button>
      </Tooltip>
    </div>
  );
}
In the code above, three tooltips have been set to display with varying transitions. The tooltips will grow, fade and zoom with a 1000ms delay.
Here’s the result:

Virtual element placement
Say you want to control the Tooltip's position and relate it to your mouse movements; you can use the anchorEl prop to implement a custom placement. The anchorEl prop's value can be a reference to a bogus DOM element. You must create an object in the shape of the VirtualElement.
Here’s a demo:
import * as React from 'react';
import Box from '@mui/material/Box';
import Tooltip from '@mui/material/Tooltip';
import { Instance } from '@popperjs/core';

export default function AnchorElTooltips() {
  const positionRef = React.useRef<{ x: number; y: number }>({
    x: 0,
    y: 0,
  });
  const popperRef = React.useRef<Instance>(null);
  const areaRef = React.useRef<HTMLDivElement>(null);

  const handleMouseMove = (event: React.MouseEvent) => {
    positionRef.current = { x: event.clientX, y: event.clientY };

    if (popperRef.current != null) {
      popperRef.current.update();
    }
  };

  return (
    <div style={{marginTop: 100}}>
    <Tooltip
      title="Hover moves"
      placement="top"
      arrow
      PopperProps={{
        popperRef,
        anchorEl: {
          getBoundingClientRect: () => {
            return new DOMRect(
              positionRef.current.x,
              areaRef.current!.getBoundingClientRect().y,
              0,
              0,
            );
          },
        },
      }}
    >
      <Box
        ref={areaRef}
        onMouseMove={handleMouseMove}
        sx={{
          bgcolor: 'primary.main',
          color: 'primary.contrastText',
          p: 2,
        }}
      >
        Hover
      </Box>
    </Tooltip>
    </div>
  );
}
In the code above,
Here’s the result:

Material UI Tooltip Event Triggers
You can control the kind of events that have to be carried out for your Tooltip to display. You can customise the actions required to show a Tooltip like this:
import * as React from 'react';
import Grid from '@mui/material/Grid';
import Button from '@mui/material/Button';
import Tooltip from '@mui/material/Tooltip';
import ClickAwayListener from '@mui/material/ClickAwayListener';

export default function TriggersTooltips() {
  const [open, setOpen] = React.useState(false);

  const handleTooltipClose = () => {
    setOpen(false);
  };

  const handleTooltipOpen = () => {
    setOpen(true);
  };

  return (
    <div style={{margin: '25%'}}>
      <Grid container justifyContent="center">
        <Grid item>
          <Tooltip disableFocusListener disableTouchListener title="Hover">
            <Button>Hover</Button>
          </Tooltip>
        </Grid>
        <Grid item>
          <ClickAwayListener onClickAway={handleTooltipClose}>
            <div>
              <Tooltip
                PopperProps={{
                  disablePortal: true,
                }}
                onClose={handleTooltipClose}
                open={open}
                disableFocusListener
                disableHoverListener
                disableTouchListener
                title="Click"
              >
                <Button onClick={handleTooltipOpen}>Click</Button>
              </Tooltip>
            </div>
          </ClickAwayListener>
        </Grid>
      </Grid>
    </div>
  );
}
Here’s the result:

Material UI Tooltip custom child(ren) elements
The Material UI tooltip's child element must have DOM event listeners. If the child is a custom React element, you must ensure that its props are distributed to the underlying DOM element.
const MyComponent = React.forwardRef(function MyComponent(props, ref) {
  //  Spread the props to the preceding DOM element.
  return (
    <div {...props} ref={ref}>
      Bin
    </div>
  );
});

// ...

<Tooltip title="Spread the props">
  <MyComponent />
</Tooltip>
Building a Login form UI with React and Material UI Tooltip
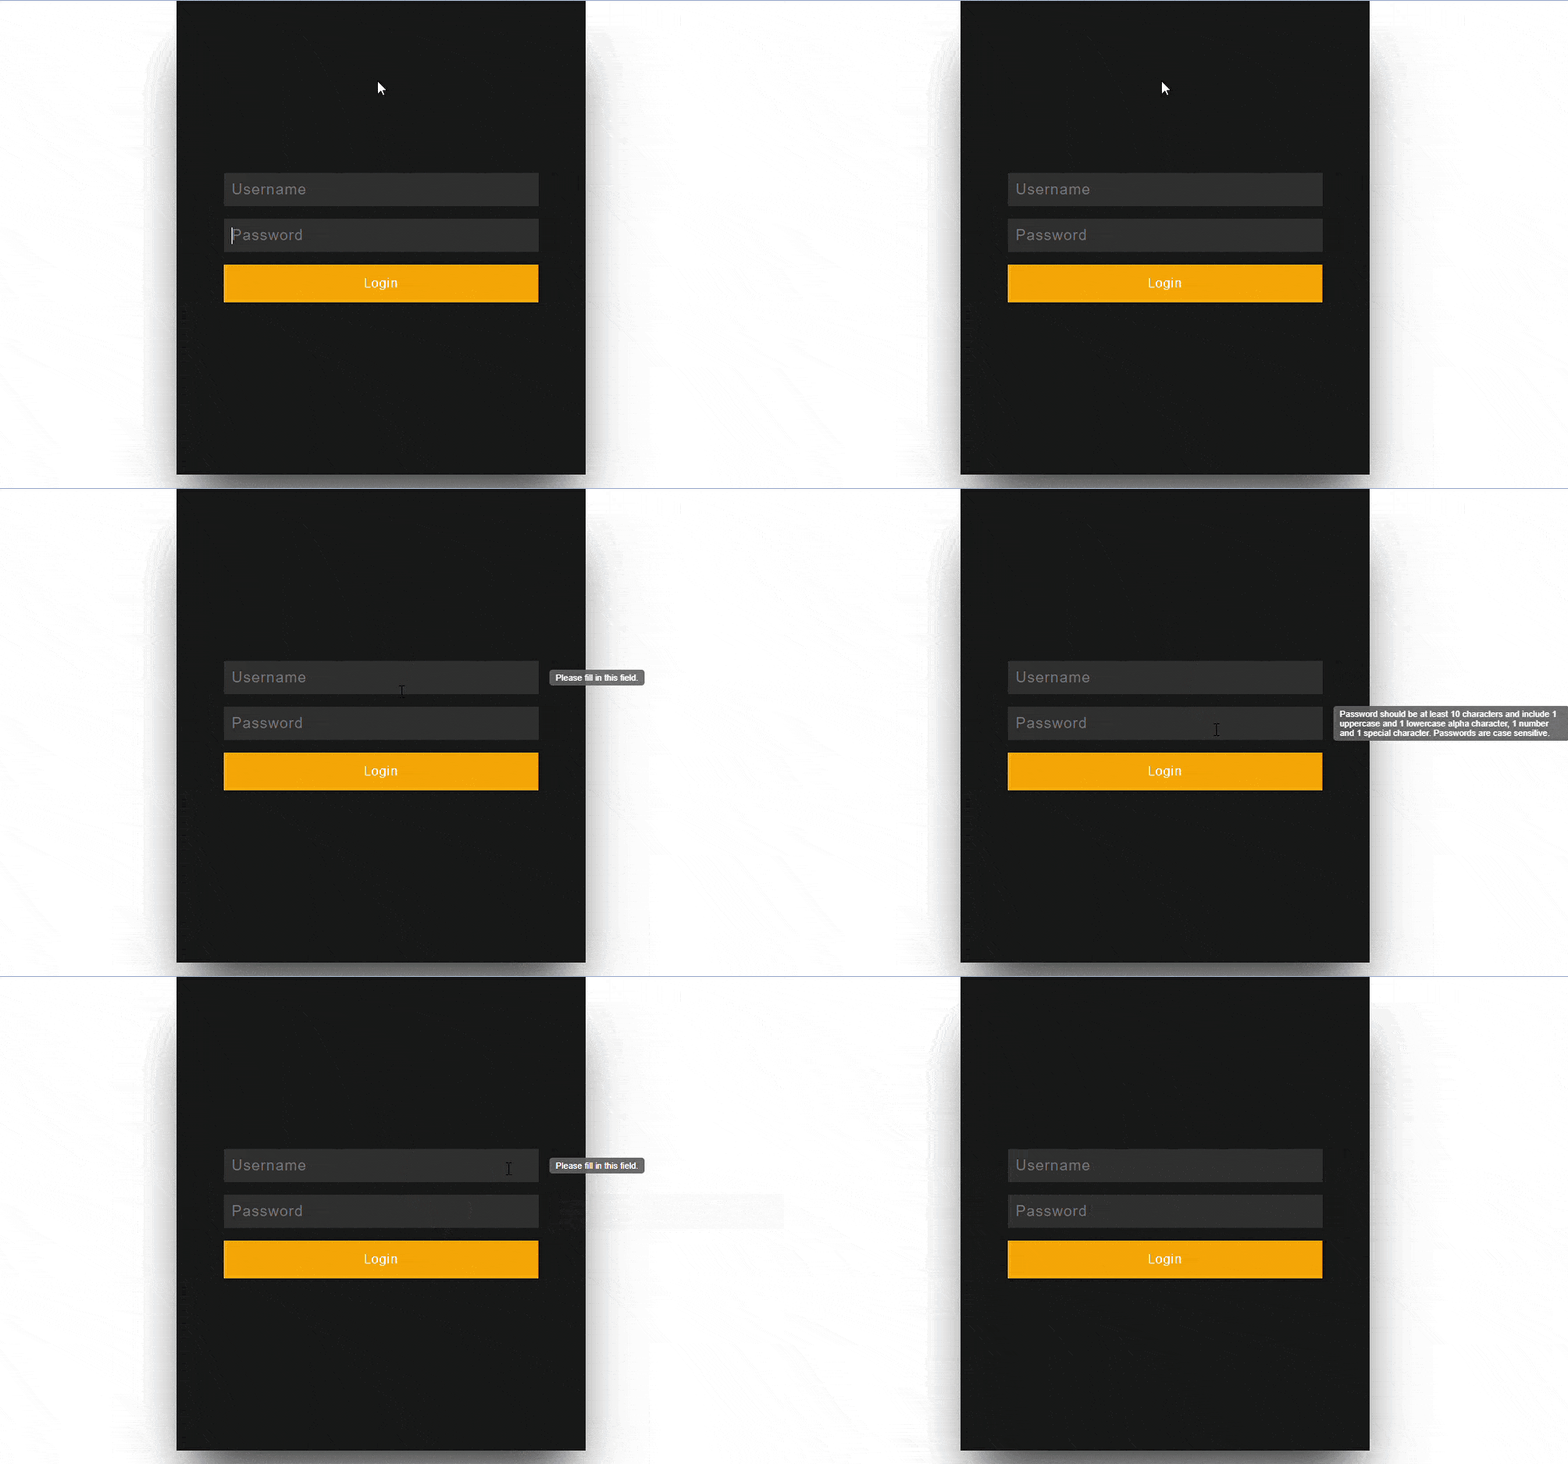
The Material UI Tooltip component can be used in so many ways and in different aspects of any web application. For the sake of this article, we will demonstrate some of its functionalities in a typical currency Login form UI.
Here’s the code:
import * as React from 'react';
import Tooltip from '@mui/material/Tooltip';
import Fade from '@mui/material/Fade';
import Zoom from '@mui/material/Zoom';

export default function TransitionsTooltips() {
  return (
    <div className="login-container">
      <Tooltip
      title="Please fill in this field."
      placement='right'>
            <input className='input'
            type='text'
            placeholder='Username'
            />
      </Tooltip>
      <Tooltip
        TransitionComponent={Fade}
        TransitionProps={{ timeout: 600 }}
        title="Password should be at least 10 characters and include 1 uppercase and 1 lowercase alpha character, 1 number and 1 special character. Passwords are case sensitive. "
        placement="right"
      >
            <input
            type='password'
            className='input'
            placeholder='Password'
            placement="right"
            />
      </Tooltip>
      <Tooltip TransitionComponent={Zoom}
      title=""
      placement='right'>
        <button className='button'>Login</button>
      </Tooltip>
    </div>
  );
}
The code above illustrates a simple login form UI with instructions provided to users with the Material UI Tooltip component.
Here’s the result:

Conclusion
This article showcased the importance of Material UI to web applications. We then put the spotlight on the Material UI Tooltip component describing its striking functionalities and application in a React application. We also looked into a Login page with instructions displayed in Material UI Tooltips as a potential use case.


